SpringBean的生命周期
Spring中Bean的创建是经过了很多的步骤,并且也提供了一些方法,方便在创建过程中获取或执行一些逻辑,完成一下自定义的操作。
我们可以通过这些方法来查看Bean的生命周期。
示例
首先创建一个普通的maven项目,引入spring相关依赖:
1
2
3
4
5
6
7
8
9
10
11
12
|
<dependency>
<groupId>org.springframework</groupId>
<artifactId>spring-context</artifactId>
<version>5.1.12.RELEASE</version>
</dependency>
<dependency>
<groupId>javax.annotation</groupId>
<artifactId>javax.annotation-api</artifactId>
<version>1.3.2</version>
</dependency>
|
接下来创建一个Result类,以它来查看Bean的加载流程:
1
2
3
4
5
6
7
8
9
10
11
12
13
14
15
16
17
18
19
20
21
22
23
24
25
26
27
28
29
30
31
32
33
34
35
36
37
38
39
40
41
42
43
44
45
46
47
48
49
50
51
52
53
54
55
56
57
58
59
60
61
62
63
64
65
66
67
| public class Result implements BeanNameAware, BeanFactoryAware, ApplicationContextAware, InitializingBean, DisposableBean {
private String message;
private Integer code;
@Autowired
private Data data;
public String getMessage() {
return message;
}
public void setMessage(String message) {
this.message = message;
}
public Integer getCode() {
return code;
}
public void setCode(Integer code) {
this.code = code;
}
public void initMethod() {
System.out.println("基于XML的init-method属性的方法,开始执行......");
}
@PostConstruct
public void postConstruct() {
System.out.println("基于postConstruct注解的方法开始执行......");
}
@Override
public void setBeanName(String name) {
System.out.println("BeanNameAware ====> 注册我成为bean时定义的id:" + name);
}
@Override
public void setBeanFactory(BeanFactory beanFactory) throws BeansException {
System.out.println("BeanFactoryAware ===> 管理我的bean factory为:" + beanFactory);
}
@Override
public void destroy() throws Exception {
System.out.println("DisposableBean ====> destroy方法开始执行.....");
}
@PreDestroy
public void PreDestroy(){
System.out.println("基于PreDestroy注解的方法开始执行......");
}
public void destroyMethod() {
System.out.println("基于destroy-method标签属性的方法,开始执行......");
}
@Override
public void afterPropertiesSet() throws Exception {
System.out.println("InitializingBean ====> afterPropertiesSet 开始执行......");
}
@Override
public void setApplicationContext(ApplicationContext applicationContext) throws BeansException {
System.out.println("ApplicationContextAware ====> 高级容器接口ApplicationContext:" + applicationContext);
}
}
|
其中依赖的Data类,用来测试属性注入。
接下来需要创建配置文件applicationContext.xml:
1
2
3
4
5
6
7
8
9
10
11
12
13
14
15
16
17
18
| <?xml version="1.0" encoding="UTF-8"?>
<beans xmlns="http://www.springframework.org/schema/beans"
xmlns:context="http://www.springframework.org/schema/context"
xmlns:xsi="http://www.w3.org/2001/XMLSchema-instance"
xsi:schemaLocation="
http://www.springframework.org/schema/beans
https://www.springframework.org/schema/beans/spring-beans.xsd
http://www.springframework.org/schema/context
https://www.springframework.org/schema/context/spring-context.xsd
">
<context:component-scan base-package="com.lfj.demo"/>
<bean id="dataMsg" class="com.lfj.demo.pojo.Data" />
<bean id="demoResult" class="com.lfj.demo.pojo.Result" init-method="initMethod" destroy-method="destroyMethod" />
</beans>
|
其次,还需要定义一个MyBeanPostProcessor类,查看后置处理的执行顺序:
1
2
3
4
5
6
7
8
9
10
11
12
13
14
15
16
17
18
19
| @Component
public class MyBeanPostProcessor implements BeanPostProcessor {
@Override
public Object postProcessBeforeInitialization(Object bean, String beanName) throws BeansException {
if("demoResult".equalsIgnoreCase(beanName)) {
System.out.println("MyBeanPostProcessor ===> before方法拦截处理demoResult");
}
return bean;
}
@Override
public Object postProcessAfterInitialization(Object bean, String beanName) throws BeansException {
if("demoResult".equalsIgnoreCase(beanName)) {
System.out.println("MyBeanPostProcessor ===> after方法拦截处理demoResult");
}
return bean;
}
}
|
然后进行执行测试:
1
2
3
4
5
6
7
8
| @Test
public void testBeanLife(){
ClassPathXmlApplicationContext applicationContext = new ClassPathXmlApplicationContext("classpath:applicationContext.xml");
Object demoResult = applicationContext.getBean("demoResult");
System.out.println("创建完毕 ===>" + demoResult);
applicationContext.close();
}
|
查看执行结果如下所示:
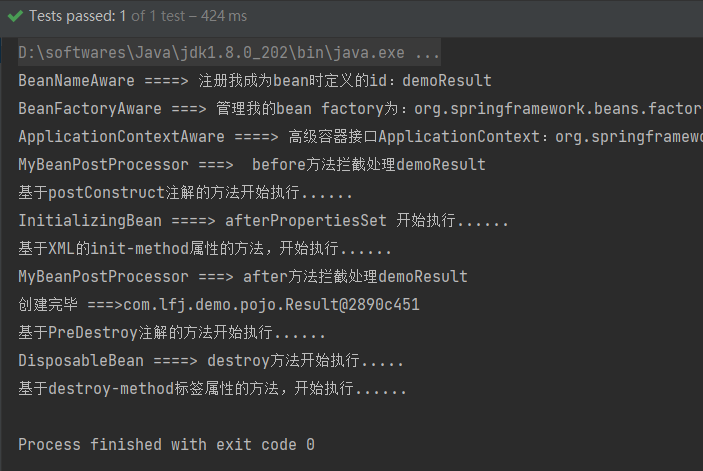
且如果断点在第一行输出的位置,会发现自动注入的Data类已经赋值完成。
生命周期图
通过上面的程序,可以得到整个Bean的生命周期图如下所示:
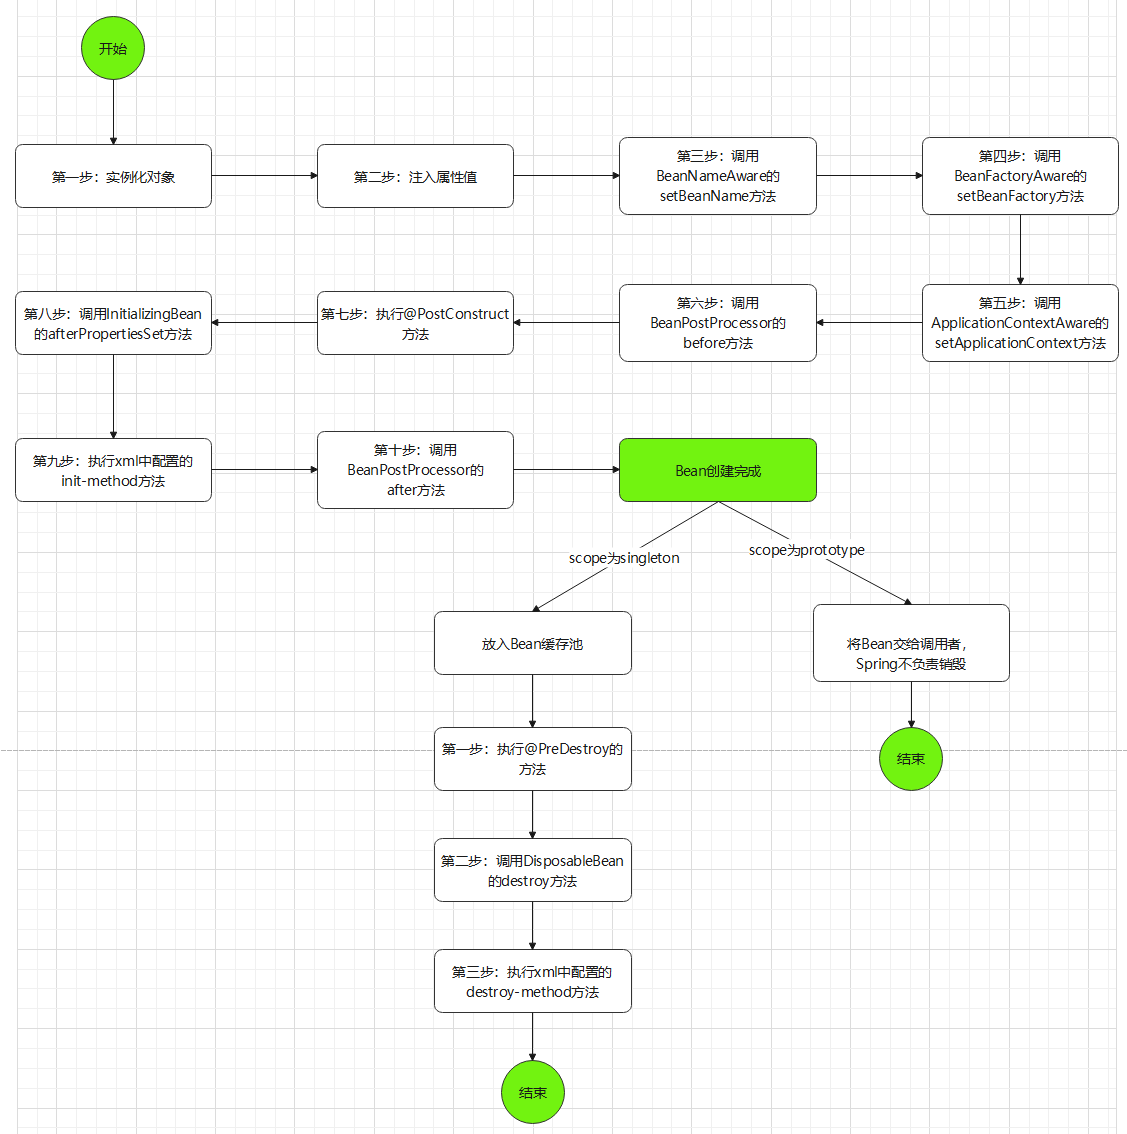
Bean的生命周期如下:
BeanFactory读取所有的Bean的属性,封装为BeanDefinition,如果有实现BeanFactoryPostProcessor接口,则执行postProcessBeanFactory()方法,对BeanDefinition进行修改;
- 例如
PropertyPlaceholderConfigurer,将配置中的占位符,用properties文件中的属性进行替换;
- 根据配置情况调⽤
Bean构造⽅法或⼯⼚⽅法实例化Bean;
- 根据配置或注解,将依赖的属性进行自动注入;
- 如果Bean实现了
BeanNameAware接⼝,则Spring调⽤Bean的setBeanName()⽅法传⼊当前Bean的id值;
- 如果Bean实现了
BeanFactoryAware接⼝,则Spring调⽤setBeanFactory()⽅法传⼊当前⼯⼚实例的引⽤;
- 如果Bean实现了
ApplicationContextAware接⼝,则Spring调⽤setApplicationContext()⽅法传⼊当前ApplicationContext实例的引⽤;
- 如果
BeanPostProcessor和Bean关联,则Spring将调⽤该接⼝的预初始化⽅法postProcessBeforeInitialization()对Bean进⾏加⼯操作,此处⾮常重要,Spring的AOP就是利⽤它实现的。
- 如果Bean中有使用了@PostConstruct注解的方法,则Spring会调用执行;
- 如果Bean实现了
InitializingBean接⼝,则Spring将调⽤afterPropertiesSet()⽅法;
- 如果在配置⽂件中通过
init-method属性指定了初始化⽅法,则调⽤该初始化⽅法;
- 如果
BeanPostProcessor和Bean关联,则Spring将调⽤该接⼝的初始化⽅法postProcessAfterInitialization();
- 此时,Bean创建完成,已经可以被系统使⽤了。
- 如果在
<bean>中指定了该Bean的作⽤范围为scope="singleton",则将该Bean放⼊Spring IoC的缓存池中,将触发Spring对该Bean的⽣命周期管理;
- 如果在
<bean>中指定了该Bean的作⽤范围为scope="prototype",则将该Bean交给调⽤者,Spring不再管理;
- 对于单例的Bean的
销毁过程如下:
- 如果Bean中有使用了
@PreDestroy注解的方法,则Spring会调用执行对Bean进⾏销毁;
- 如果Bean实现了
DisposableBean接⼝,则Spring会调⽤destroy()⽅法将Spring中的Bean销毁;
- 如果在配置⽂件中通过
destory-method属性指定了Bean的销毁⽅法,则Spring将调⽤该⽅法对Bean进⾏销毁。

 wechat